Developing mobile apps with React Native
Introduction
React Native is an open source framework created by Facebook that allows you to develop cross-platform mobile apps (iOS and Android) in Javascript using the React paradigm.

Often developers who work on mobile (but also those with experience in the sector) share the same basic fear: will I be able to master the complexity of a world in constant evolution? Can I apply my previous web knowledge to mobile development? What languages do I need to know and how much time will I have to spend to learn how to work with iOS and/or Android ecosystems?
These are all questions that may be difficult to find solutions to but to which React Native seeks to provide simple answers. What’s necessary to get going is:
- a basic knowledge of the React framework, which can be acquired quickly (we’re talking about hours here)
- a discreet knowledge of Javascript (preferably ES6)
- Xcode installed (in order to be able to develop on iOS) and/or Android framework installed
- a basic knowledge of the target ecosystem (see next paragraph)
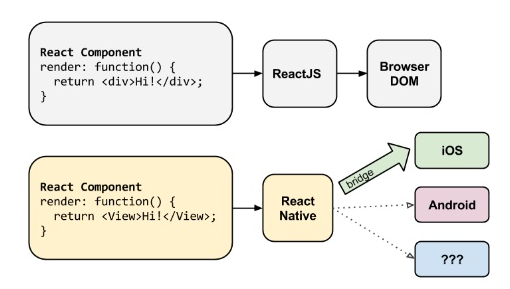
At the highest level, the difference between React and React Native essentially consists of the “target” of the application:
- the DOM in the case of React
- the native UI of the current platform in the case of React Native

In addition to greatly reducing the overhead required by the programmer in terms of knowledge for mobile development, React Native brings with it the advantage of a cross-platform framework: the JavaScript code we write “runs” on iOS and Android, so the porting of an application between the two ecosystems is “almost” transparent. The “almost” (practically mandatory in the mobile world) refers to the possibility that the app uses different “native” aspects in the two ecosystems, which therefore must be managed ad-hoc in the code.
Debugging a React Native app could not be better: those coming from the React world know how comfortable it is to see your application updated simply by saving the code you are working on; this is also possible in React Native without having to recompile any Xcode or Android project. Integration with chrome developer tools is also supported by default.
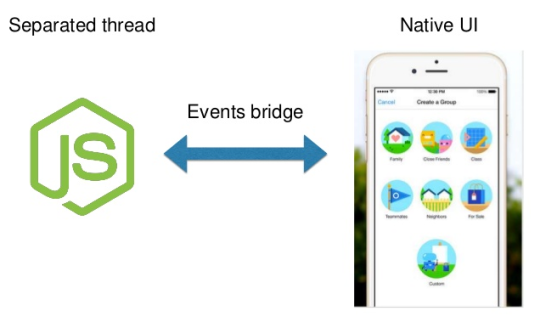
Although the framework is cross-platform, React Native is strongly linked to the native platform on which it is “target”. In fact, React Native does not develop a “mobile web app” a-la phonegap but an actual native app, using the same basic graphic blocks as a native Android or iOS app.
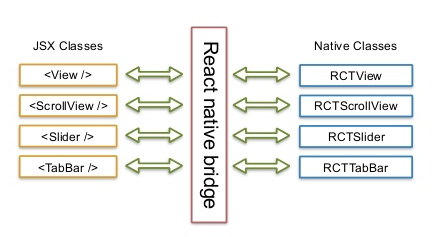
In concrete terms, the developer will write React components in Javascript/JSX that will be “mapped” into their native equivalent. For example, the rendering of the ActivityIndicator component of React Native uses “underneath” an instance of the reference Java/Objective-C class of the native sdk, i.e. the classic Android spinner rather than the iOS “wheel”. Javascript React Native side exposes, for each component, a set of properties common to all native implementations, for example, the Boolean “animating” property in the case of the activity indicator.

Furthermore, the mapping mechanism on native entities concerns not only the graphic components but also the system APIs, which are similarly exposed to JavaScript.
Finally, the user can extend the framework by implementing their native bindings (for example, to exploit the JavaScript side, a native feature not yet officially integrated into React Native). This flexibility allows for hybrid applications, in which one part is developed natively and another in React Native. For those accustomed to the native this possibility could be decisive when considering a transition to React Native.
Integration with the ecosystem – Advantages and disadvantages
React Native does not exempt the programmer from a knowledge, albeit basic, of the target ecosystem (iOS and/or Android): having clarity of the final result in terms of graphics and interaction is a prerequisite that becomes increasingly important as you try to implement an app similar to the native equivalent.
As described above, in fact, the developer delegates to the framework “mapping” of the React Native components in the corresponding natives, but there is no help from React Native about how these components should be combined or organised in order to achieve a consistent native interface.
In short, the “native” effect in React Native does not come at no cost: it is necessary to read the iOS guidelines rather than Material Design just as you would for a native app. Given that the coverage of native Android and iOS components by React Native is partial (nor does the totality of the SDK fall within the scope of the framework cover), it is possible that certain features provided for your application are not officially supported. In these cases the developer must be able to understand:
- if there are third-party packages on github that solve the problem
- if it is necessary to wrap the feature of interest in an ad-hoc manner
which may not be immediate.
If the main requirement of an app is to have exactly the same graphics and the same interaction on Android and iOS, instead, all the disadvantages described above vanish and React Native becomes the ideal candidate for development. Ultimately, the more the app abstracts from a specific ecosystem the more convenient it is to use React Native.
Beyond the “native” or non-native effect of an app, those who develop in React Native must still know how to use Xcode and/or Android Studio (or Android command-line). Fortunately, it is not necessary to know how to create an Android or Xcode project from scratch: React Native supplies a package called “react-native-cli” containing a number of utilities:
- for the creation of a project (
react-native init) - to run the app (
react-native run-androidoreact-native run-ios) - for the linking of native dependencies (
react-native link).
and other aspects.
The embedding of resources in the installation package (apk for Android or ipa for iOS) is automatic for those referenced directly by Javascript with the “require” instruction (at the moment “require” only supports images, json files and Javascript files), while it must be performed manually for the other resources. In other words, if the app uses a custom font then it must be added as a resource to the Xcode and Android project manually, according to the methods foreseen for a native app (the React Native documentation on these points is generally quite detailed).
The testing of an app (for example with TestFlight), as well as the creation of the Playstore board rather than of iTunes Connect, also has nothing to do with React Native: they are all activities to be carried out according to the methods envisaged by the ecosystem.
Native interaction
Develer has created several projects in React Native, including an app developed on behalf of LILT (Italian League for the Fight against Cancer) for the prevention of breast cancer.
The app is available as opensource on github and has been developed for both Android and iOS, for smartphones and tablets.
LILT is the classic example of a mobile application with predominantly static content, where the aim was to provide an experience as “native” as possible using React Native. Where possible we therefore used official and standard components, but in some cases this was not enough.
Platform-aware tab widget
On the structures page of the app, for example, a widget tab appears that distinguishes the various types of structure (Breast Centres, iSPO [Institute for the Study and Prevention of Cancer], …) different between Android and iOS. The design of the app required a variant of the system segmented control for iOS and the classic tab widget for Android (for example the one in Whatsapp) which however natively also allows swiping between the tabs. We therefore have a difference that is aesthetic but which also varies in terms of user interaction.

Apart from the segmented control custom on iOS there is no standard React Native component for the Android widget, so we looked for an alternative solution on github. Fortunately the React Native community is very large and active, and most of the time there are third-party packages that provide the “missing pieces” (a neat list of unofficial but good quality React Native packages found on github). In the end we opted for the react-native-scrollable-tab-view package, which provides all the out-of-the-box features we needed.
Once the components to be used are identified, managing the different renderings on the two platforms is very easy in React Native, which provides two basic mechanisms:
- a
Platformpackage that is used to discriminate the platform with an if (e.g.Platform.os === 'android'). This was sufficient in the case of our widget tab. - an automatic recognition of the component to be used based on the file name. Assuming that the component to be used is “C”, we can create two files “C.android.js” and “C.ios.js”: React Native will use the correct file depending on the current platform. The glossary page in the app uses this approach.
Wrapping of native iOS features for the glossary page
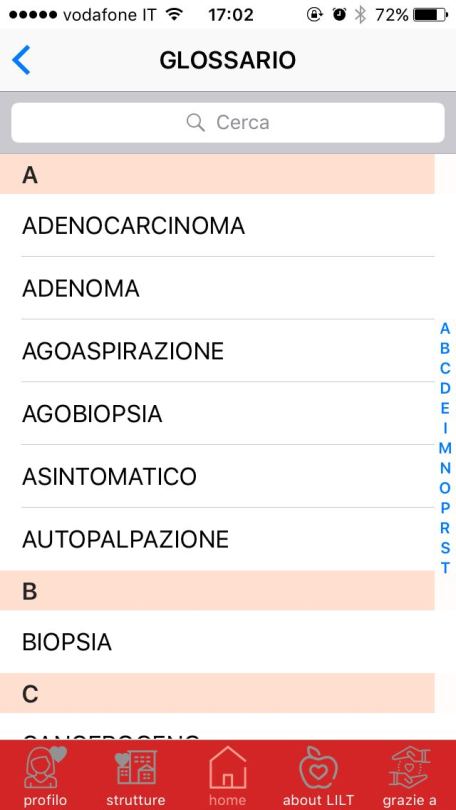
With regard to the implementation of the glossary page, we encountered another obstacle. This page presents a search bar to locate individual glossary items and a list of items with sections. On iOS, moreover, there is a bar to the right of the list containing the initial letters of the sections to quickly scroll to the item of interest (such as the phone contact app).

By limiting the discussion field to iOS only, there are no official components either for the letter bar next to the list or for the search bar. Here too we used a third-party package (react-native-search-bar) for the search bar, but the list of entries required a little more work.
The native iOS component to use for the list of entries is UITableView (very complex and fairly central in the iOS sdk), whose features are only partially wrapped in React Native by an unofficial package, but with enough “stars” on github.
As the React Native support for the letter bar had not yet been implemented in the package, we forked the github repo and added this functionality; finally, we used our fork as a dependency in the “package.json” (the official method for managing dependencies in the React, and therefore React Native) projects.
Management of different resolutions
The LILT app was published for both smartphones and tablets, but reusing the same graphic design on both types of devices. In principle it is always preferable to rethink the graphical interface of an app when deciding to publish it also for tablets, for example to better exploit the larger available area. For budgetary and/or deadline reasons it is sometimes not possible to create new graphics for tablets and so a re-adaptation of smartphone graphics was chosen. This is what happened with the LILT app.
There is no general rule for dealing with such widely differing resolutions. In our case we mainly had pages of static content that suited both smartphones and tablets well, so we focused on the home page, the most problematic one from the perspective of graphics rendering because:
- the requirement was to show the content entirely on the various devices without having to scroll
- the page develops vertically and so on not particularly high smartphones (like iPhone SE) the content was not entirely visible
- given the scarcity of menu items, on tablets we had the opposite problem, essentially a lot of unused white space below the content
Taking advantage of the fact that the app is locked in portrait mode, we decided to divide the various devices into four “height bands” depending on the number of logical pixels (first checking the resolutions present on the market):
- above 1000 dip height
- above 700 dip height
- above 600 dip height
- other
and to adjust ad-hoc the flexbox layout of React Native on the home page based on the band of the current device. Specifically, we used the Dimensions package from React Native and implemented a simple Javascript function to choose the correct height value of a generic element:
const dim = Dimensions.get('window');

const computeHeight = (over1000, over700, over600, other) => {
  if (dim.height >= 1000)
    return over1000;
  if (dim.height >= 700)
    return over700;
  if (dim.height >= 600)
    return over600;
  return other;
};
In style sheets we invoked the function with the ad-hoc height values we found empirically:
home: {
    paddingTop: ios ? 0 : 20,
    menuHeight: computeHeight(310, 250, 220, 190),
    belowMenuHeight: 100,
    logoImageHeight: computeHeight(90, 70, 55, 50),
    logoImage: require('../images/logo_home.png'),
    ...
}
This simple trick was enough to achieve the goal.
Calls, opening of links and maps
The LILT app has a “structures” section containing phone numbers, e-mails and useful addresses for users who need information on breast cancer centres in the Florence area. The info is “clickable” and what happens reflects the native behaviour of an app:
- If you click on a phone number a call to that number starts
- If you click on an e-mail address, the native mail client opens with the fields pre-filled, ready for the sending of that e-mail
- Clicking on an address opens the native map application, which places a marker on the specified address
React Native handles this type of interaction with the Linking module only, which is used to “open” generic URLs with the openURL Javascript function. For example:
- the URL relating to a call to the number 055 3984627 is tel:0553984627. Opening the URL starts the call with the system dialer.
- the URL to send an e-mail could be mailto:info@develer.com
- the URL to open a map on Android is http://maps.google.com/?q=…
- ; the URL to open a map on iOS is http://maps.apple.com/?q=…
React Native side, a simple utility function sufficient to manage all these cases:
const openURL = (url) => {
 return Linking.canOpenURL(url)
    .then((supported) => {
      if (supported) {
        return Linking.openURL(url);
      }
      else {
        console.warn('Cannot open URL: ' + url);
      }
    })
    .catch((e) => console.warn(e));
};
Conclusion
React Native is a framework that significantly simplifies the life of anyone dealing with mobile and it is also attractive to industry experts as a cross-platform development technology alternative to the native or other frameworks such as phonegap.
It is used to easily manage the complexity of a mobile project and to bring an app from one platform to another with very moderate time scales. It also provides the flexibility to intervene natively where necessary.
A knowledge of the target ecosystem is however required, and in a way that is much deeper than trying to obtain an app that reflects its native equivalent. In these cases React Native risks being, due to the relative “youth” of the framework and of the community, a hindrance rather than an aid.
With a strongly active community and an open source codebase, React Native is undoubtedly a technology to be tested for mobile development.